

This serves as a guide for writers, so I don’t have to explain the things individually to each person in the future.
It’ll also give others an idea of how the tools work for when I make the engine and tools available to more of the public.
Introduction to the interface.
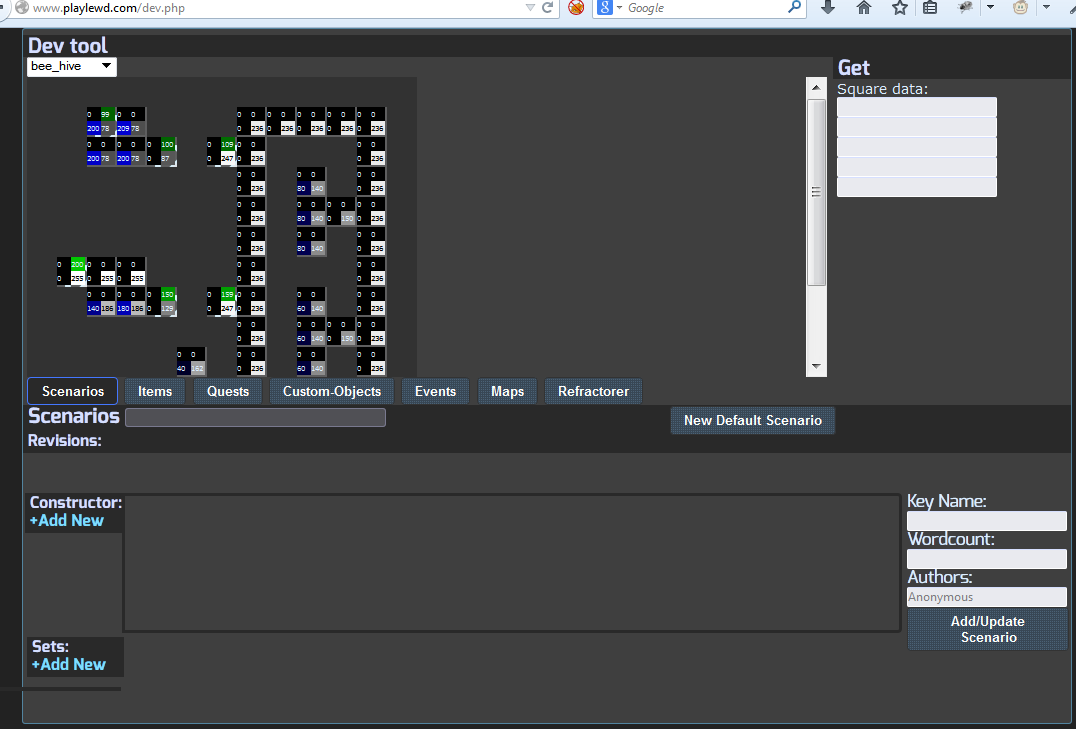
This is what it looks like when the tool is first opened. It’s on the web, so there’s nothing for each developer to download and install. You just visit a URL (assuming your account has access, of course).
At the very top is map data, as it’s typical for things that are added to have some interaction with the map/zone.
There’s a drop down to change which map is selected.
The four numbers on each tile correspond to the red-green-blue-alpha pixel data for each. This is data that’s hidden to the player, but there to make parts of the engine work. IE you can assign CSS styling based on it to the client, and you can bind Scenarios or other Objects to tiles based on the texture data. That’ll become more clear in a bit.
Below that is a list of tabs. Scenarios, Items, Quests, Custom-Objects… This is where new things are added, and old things are edited.
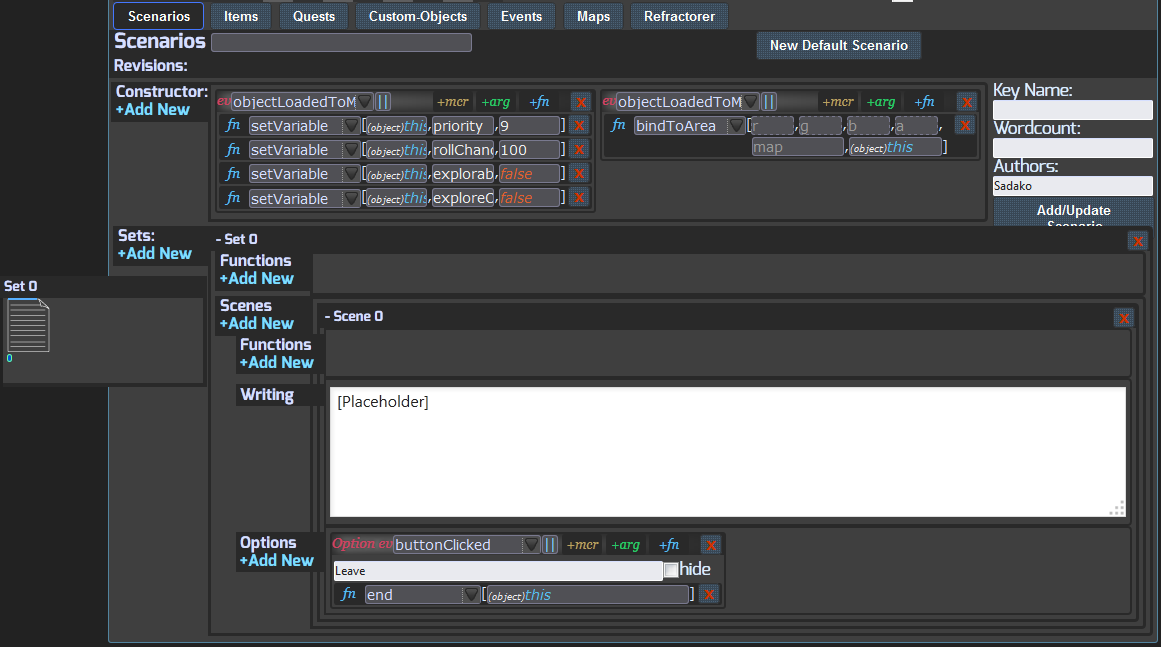
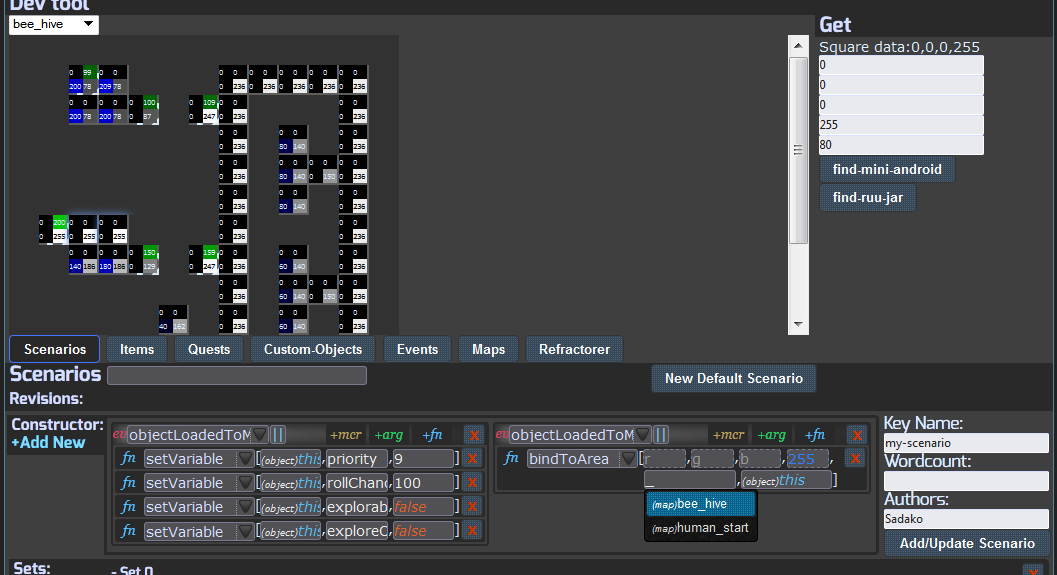
Clicking “New Default Scenario” gives this.
It creates a “set”, a “scene”, a (dialog) “option”, and sets some basic variables.
This is set up in a way that different games with different requirements can set a different default. In the case for LEWD, these are the default things.
bindToArea: This is a function that binds the Scenario to tiles so it’ll be rolled, or explorable, and so on. Technically, you can bind any object to tiles this way, and it’ll add them to an array on all corresponding tiles, but then you also need more logic that decides on what to do with them.
setVariable: This is setting variables on the Object, or Scenario in this case.
These are simply key value pairs that I’ll go into more later.
They get complicated, though, when instancing comes into play. Again, more on that later.
priority: This variable sets the order in which Scenarios are rolled when someone enters a tile it’s bound to. Lower number ones will roll first, until one is selected that completes a roll and verifies that it should be sent to the player given any requirements it may have.
rollChance: This is the chance for it to roll. 100 means a 100% chance, it’ll always roll and deliver to the player unless some other criteria fail.
explorable: If this is set to “true”, the “explore” button will highlight for players when a tile has an explorable Scenario.
exploreOnly: if this is set to “true”, not only will the “explore” button show, but it also won’t automatically roll when the tile is entered.
Set: These are just for organization and are invisible to the player. You can just put functions in them, making the way things redirect be cleaner.
Scene: These are what they sound like. The scenes that are sent to a player, containing functions, writing, and the dialog options.
Options: These are the dialog options.
Functions: These run logic. Giving quests, requirements to run something, redirecting scenes, etc.
So far, all I’ve done is click that “New Default Scenario”. The next step is to have something that’ll actually open up.
So here I’ll go over a few things.
On “bindToArea” one of the fields asked for “map”.
The editor automatically figures out some things that could be applicable there, and tries to help you fill them in. In this case, it has an auto-complete of all the maps saved. Just clicking it brings a complete list, or as you see here I put in an underscore and it shows all the maps with an underscore in it.
If it wanted a “quest”, you can start typing a quest name and it’ll autocomplete the rest. But this function needs a map to bind to.
Some inputs have a dotted outline. There are optional parameters. So r, g, b, a(or red, green, blue, alpha) don’t all need filled in.
In this case, I’ve just filled in the alpha as 255. You can see on the map all those 255 squares, which means this’ll get bound to all of those.
So, after clicking save, now every time one of those tiles with the white background 255 is walked onto, it opens up the little Scenario that just says “[Placeholder]” and has the “leave” option.
Not very useful, but that’s the start. With those few things set, there is something there that you can see working.
Now there are some potential issues. At that 200 green square, that’s the Scenario that comes up welcoming to the area. These are overlapping. The priority should be made a higher number so it won’t take precedence over the area entering message that comes up.
There’s also not much to it.
This is networked.
When you save something in the dev tool, it will show up for all the others using the tool.
I wanted writers to be able to collaborate on things, so besides the instant updating in game for players, there’s also the instant updating between devs.
I intend to also add something that shows there are others currently working on specific things. You know, what they have open. And some way to share notes about each thing between devs.
Directing the flow of dialog options.
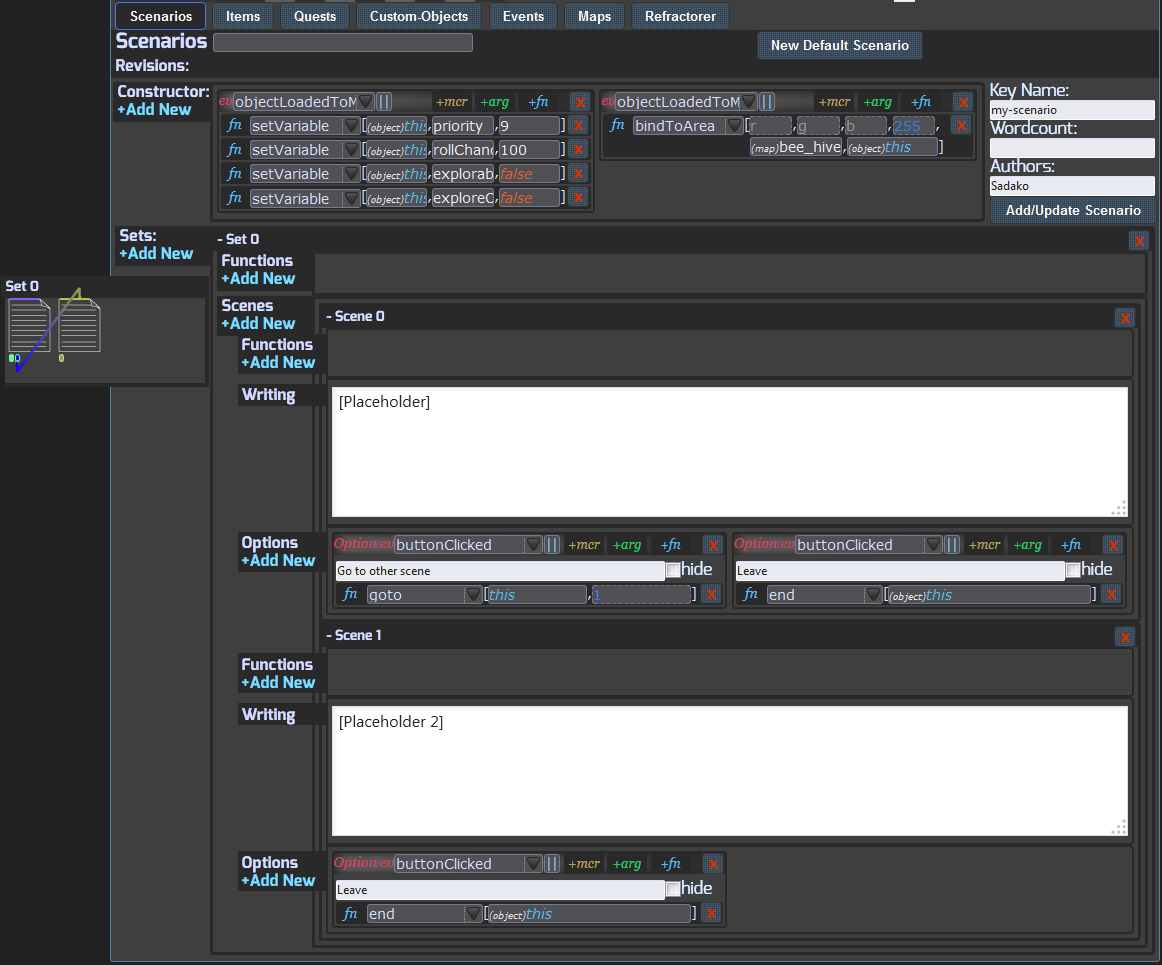
There are all those “+Add New” buttons to add more functions, scenes, sets, options, etc.
Clicking to add a new scene, and a new option on the first scene, then just changing the text for the option and setting the function from “end” to “goto”.
“goto” asks for a set and scene to, well, go to. The set can be set to “this” to use the current set that the scene is part of. And then it’s pointing to “set 1”, which in this case is the second, but these indices count from 0 up, not 1 up.
Now when that comes up, it has two options, one which closes it and the other which sends the “[Placeholder 2]”.
At the left there is also a flowchart that shows where “gotos” point. But yeah, it’s bugged at the moment and showing the second option as pointing to the second scene, instead of the first option pointing there. That’ll be fixed soon.
Also, hovering over a “goto” pointer shows a excerpt of the writing of both the source and the destination to help see the flow when things get complicated.
So you have some basic “conversation” there, but it’s not very dynamic. It’s just some thing that comes up all the time, and is always the same.
That’s all it takes to have a basic scenario working in game, though. Since these things update in real time, you can move around in the game to where you’ve bound a Scenario and see it come up.
Visual programming
This is where things get complicated. Just some basic knowledge is needed for things like requiring/giving quests, but these can actually do some really deep logic.
I wanted to make sure it was capable of doing things like Space Station 13, or incorporating all the rules of a table top game, so there is a balance of ease and use and capability.
Visual scripting is nothing new. Lots of tools have node-based programming.
Instead, I decided to make a sequential system.
It’s not a matter of “it’s new, so it’s better” because I haven’t seen it before, but because there are problems with those node based ones.
One problem is how they give a very poor idea of how code actually executes. Nodes let you break up things all over the place, but the thing is that the code executes sequentially. So why not have a sequence of lines? The system I came up with better illustrates how things actually executes.
Now, you actually can have things execute asynchronously using “delay”, but that’s very explicit.
The other thing is that node based systems can become very messy. I went with a system of typed parameters and references instead.
While it’s nice to have reference nodes that plug into many points in those systems, the same thing can be done “under the hood” to group up multiple instances of the same reference here, without the huge webs of lines that can become hard to follow with complicated code.
Technically, the JSON that gets generated for the game server to compile could be generated with node based programming with a client side modification to the tool.
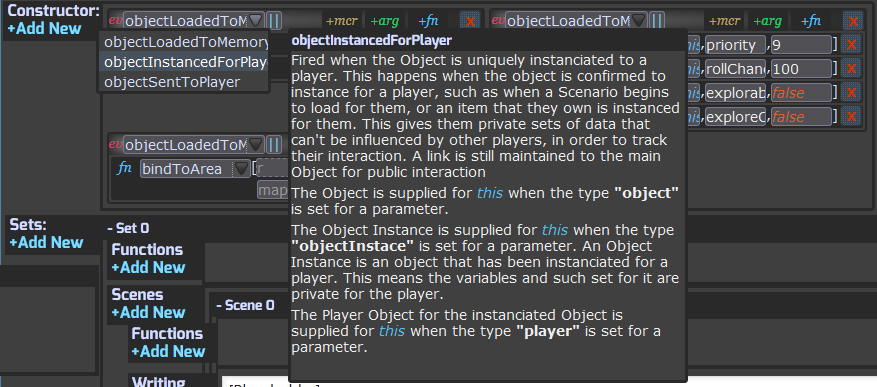
First are “events”, indicated by the red “ev” text.
An Event should be what it sounds like. It’s a thing that happens. It’s something you hook onto to have your logic execute when that happens.
Hovering over it gives some information about the event. You’ll also notice that “this” shows up in a lot of places, and hovering over the Event name shows what sort of “this” get supplied. IE with objectInstanceForPlayer you have access to (player)this.
Now it doesn’t have to be this. If there was a scenario named “test” and (scenario)test were inputted instead, it’d looking up that scenario and supply it in the function instead of “this”. “this” is just a really convenient thing, and also faster.
I will also be adding a way to trigger custom Events down the line, that’ll make all logic set to that Event run.
That’s actually a really easy thing to add on paper, the difficulty just comes in adding dynamically set things to the tool. In other words, it needs a way to figure out where that Event should be available to select. So that’s why it’s not already here.
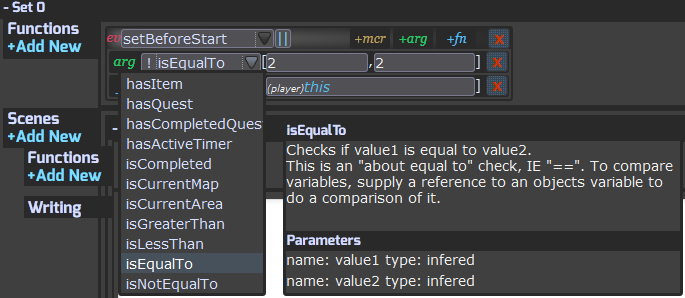
The next are “arguments”, indicated by the green “arg” text.
Arguments is something that needs to pass in order to continue.
In this case I have “isEqualTo” 2, 2. Well, that’ll always pass. 2 is equal to 2. Pretty useless, but you get the idea.
It becomes useful when you use a reference, which I’ll show in a bit.
You can add more arguments with the “arg” button.
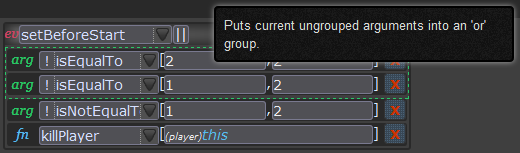
Here I’ve added another argument, and put it in an “or group”. Then I added a third.
An “or group” basically says “only one argument in this group must pass”, and is indicated by the green dashed outline.
You can drag an drop arguments into or out of an or group, and reorder them. (Well, at the time of writing this I broke some things with some of the dragging and dropping, but that should be fixed soon)
Arguments are NOT required. If there isn’t one, functions will simply run as if there was a passed argument.
In this case, these arguments will pass. 2 is equal to 2, so even though 1 isn’t equal to 2 it passes. And 1 is not equal to 2 which passes for the “isNotEqualTo” function.
So the function will run. In this place, the player the scenario has run for gets killed. Useless, but an easy to understand example.
“Functions” are the blue “fn” text lines. These are the actual logic that runs
Functions can be added with the “+fn” next to the event. In this way, one set of arguments can have lots of logic run in sequence.
Hovering over function names tells you what they do, and they can do a lot more that’s immediately apparent with some clever use of them.
For example, here’s some more useful logic:
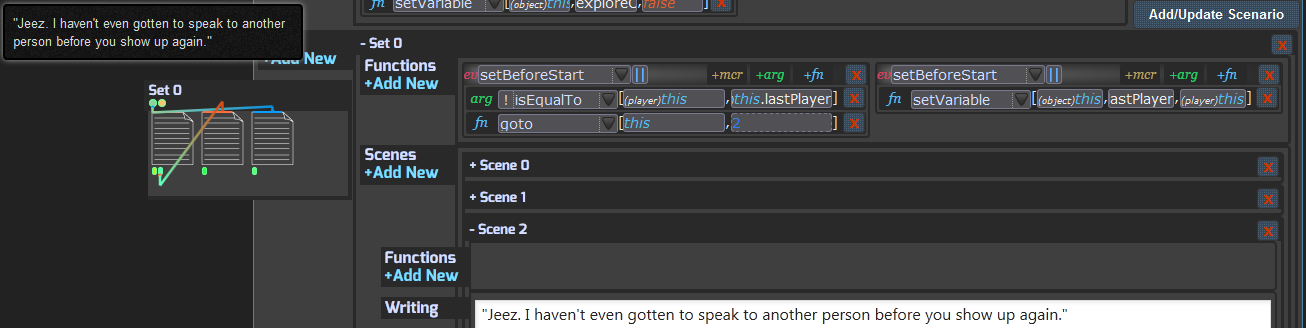
So here I’ve just clicked a few buttons. I added two new functions to set, and I set an “isEqualTo” argument, a “setVariable”, and a “goto”.
Well here you see a much more useful example of “isEqualTo”. It’s comparing references.
It’s a little hard to explain these to non-programmers, but they’re what they sound like. It’s like a pointer to a larger thing.
Here it is seeing if the current player is equal to (object)this.lastPlayer. The “.” is a separator that tells the compiler to look for a variable that’s been set, plucking out a reference.
That “lastPlayer” variable is set with “setVariable”, but only after doing this check.
If it passes, it means no other player has activated the Scenario since the last one. It means a particular player has activated it twice in a row. Again, keep in mind the sequential nature of it. The logic runs in a line, and the setting happens after the check.
You can see the function dots at the left, with one of them directing to the third scene(index 2). It also shows an excerpt of the writing there.
This all comes together to make that promise happen where I said there would be highly dynamic content.
It literally took me a few seconds to get something in game that would deliver a special scene if the same person activates a scenario twice in a row, without another person activating it in between.
Instead of having to specifically hard code specific mechanics into the game engine, it’s easy to just add them with visual scripting in a matter of seconds.
The same can be done with incrementing counts for when players use and/or exit a scenario, to make special things when lots are using one at once, or to have a count of how often something has happened.
Not only that, but there tends to be many ways to achieve a desired effect, just like with real programming. There is rarely one specific “correct” way to do something, which makes it easier to figure out how to make something happen.
Custom Objects
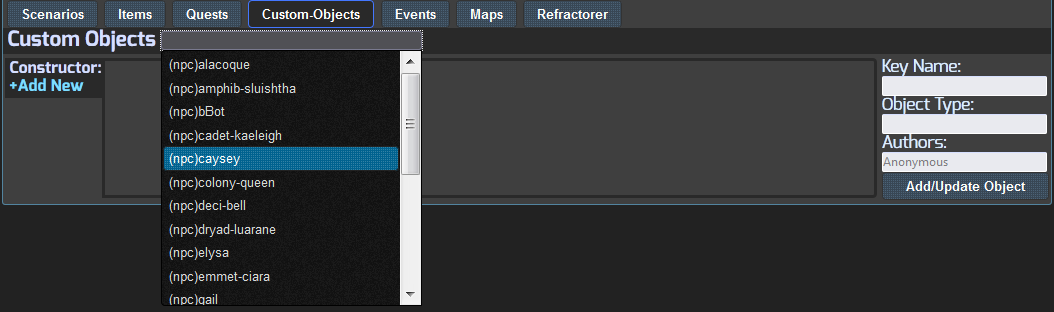
I wanted to store data with NPCs. Like, this wasn’t possible before, but it should have been possible to have one NPCs info associated with multiple Scenarios.
Here you can see clicking the field next to them brings and autocomplete list of them.
Like they could turn off on one area, and activate in another. Or they could even be walking around, the engine definitely supports that, but it’s not something I’m doing right now.
Especially when it comes to transformable NPCs, if they exist in two places this makes things much easier.
I implemented “Custom Objects” to make whatever is needed, instead of making a new specific thing just for NPCs.
It’s important when it comes to more complicated logic that Scenarios, Items, Quests, and Custom Objects all inherit off of “object”. So any function that requires an “object” will work with any of those.
This type data is also stored the same way it is in the main Objects, so custom functions can be written to just work with certain Custom Object types.
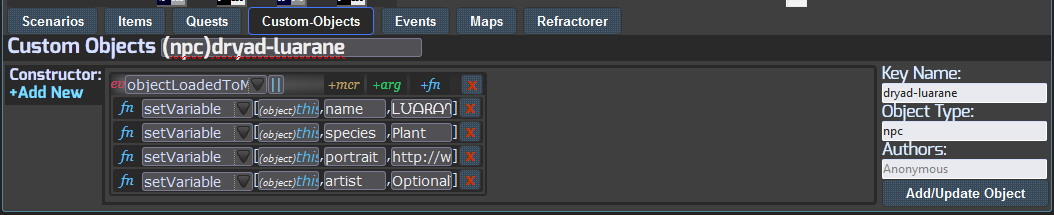
Clicking one of them brings up something like this.
I’ve set data for a name, species, portrait url, and artist credit. Pretty simple stuff. Now here’s how it gets used:

So there’s two things circled.
This is the Scenario that used that npc data, and sends it to the player.
Firstly, I’m setting an “npc” variable on construction. That parameter provides a whole list of every single object to select from. There’s auto complete on it too, but I let the whole thing show here to give more of an idea.
Next, on the “objectSentToPlayer” event, the “emit” function sends the data to that player that’s instantiated it, with an event name for the client, and the data sent is the reference to that npc variable.
More interesting things with “emit” means modifying the client code to do something with the data received, but yeah. When it comes to making other games on the engine, there’s a lot that can be done with that to have simulation running on the server and data emitting to the player(s).
There’s lots I’m not going to go into detail about that here. It’s not something my writers need to know, except for that basic example of how to set up an npc card, which should also give an idea of how to set data on an npc.
Macros
+
“Macros” are a way of saving a set of arguments and/or functions that are used often, instead of having to list them all out again by hand. You just click “+mcr” and select one from the list, or a new one can be saved based on all the arguments and functions in one of those boxes that groups them together with an event.
Writing Parser
All that logic described above is executed/simulated on the server.
Lots of times, there’s minor details that can be modified on the client. These are the things you considered safe for modding/cheating.
The writing parsing is executed on the “writing” and “options” text, and uses my own markup language and psuedocode interpretation.
[[This may show,,This could show instead]].
A way to randomize text that shows.
Oh my, that //emphasis//.
Italics.
How **bold**.
Bold.
Nice to see a %specie around here.
String substitution. String substitution automatically kicks in when one of the words is after “your”. IE “Your chest”. This will not happen if it’s somewhere in quotation marks, if I remember correctly. (If not, I need to fix that). Since “Hey, what’s your penis like?” shouldn’t instead describe the PC’s cock. These “natural language parsings” can always be stopped by putting a \ before what would be parsed.
“Your eyes focus…” shouldn’t need an special markup in it. I wanted writers to just be able to write, so it tries to interpret these things for you.
It will make it plural if it ends in an “s”. When singular words end with s like “species”, chop the “s” off or it’ll be made plural. IIRC it does the same with ending with “ed”. If not, that’s something I should probably add.
(if hasBottoms){show this PC is wearing bottoms}
This is much more complicated, and powerful. This is how you get specific text showing just for certain sexes, species, stats, and other variables. You can also nest these IE (if hasPenis){show for having a penis(if hasVagina){ and show this if they have BOTH}}.
And you should be able to put or or and marks on these. I forget if I added that yet, but it’s intended. (if hasPenis && hasVagina){Show this if both are had} or (if hasTop || hasBottom){Why are you half naked?}.
A glance at the parser looks like || work but && don’t. Looks like they’re stupid sensitive to whitespace. I should get && working soon and make whitespace lax.
I feel like I’m forgetting some things.
The writing parser simply “reads” the writing and does a lot of things automatically.
There is a noRemove() and remove() “function” that if you type it in a sentence, in the case of the later it’ll remove clothing from any body parts mentioned, or completely remove an article of clothing mentioned.
The clothing system in LEWD is extremely complicated. Things can be torn, cut, covered in slime, cum, whatever. A PC could be wearing a long sleeve shirt under a short sleeve shirt under an armband with a scarf hanging over one side of the chest and back, anddd with an eyepatch. It knows how to describe those things, and knows how to make them get removed. … for the most part. Sometimes you have to mention body parts that need to be uncovered in the writing, and throw a remove() in the sentence. That word will get removed as well as temporarily stripping that clothing until the scenario ends.
noRemove() on the other hand is for when you write something, then you read the scene, and go “uhhh that isn’t what I wrote”. Like say you write “He pulls you down by your pants”. Well, the writing parser could possibly use work to understand that properly. I really wanted to make it better. It’s pretty great now and I’m proud of it, but it fumbles on something like that. It sees the verb “pulls”, “down”, and that you are wearing pants, and it assumes something pulled down your pants. When that happens, you just have to throw a noRemove() somewhere in the sentence, anywhere, and it’ll know not to do anything there.
It could use some more work, and I want to work on it more. Trying to get a computer to understand English is pretty fun.
I will make a list of all the string replacement things, later. Ideally they should dynamically populate.
I need to add a “Player” object to the dev tool. Right now the player variables are hard coded, which is pretty shitty, but it saved a lot of time. Once I start collecting some funding and such, I’ll definitely pay more attention to those things.
Some examples of the variables in LEWD that get string replaced are primaryOrifice, vagina, penis, genitals, all the basic body part names, cum, juices, top, bottoms, underwear.
And top, bottoms, underwear are assigned to what it thinks is probably the main thing covering those areas, even though there can be many layers.
More
I’m not going to go over everything. Some things still aren’t finished.
Items and Quests are pretty self explanatory, especially when Scenarios are understood.
Some things aren’t implemented yet:
- Custom functions (written in Javascript, they’d be selectable in the list with other functions. These would also JIT compile; no server restart required)
- Map maker. Currently I make these in photoshop and they require a restart. I will be making a map maker in the dev tool so you can set the size, assign values on tiles. They will be updatable without a restart, so the maps can change in real time while players are on them. There will also be some logic construction here.
- Tick based function execution. This means having logic executing in a loop. This is useful to do things like having oxygen values applied to tiles on a map, and have logic depleting oxygen based on other variables and such. It’s also useful for things like AI.
- Combat API. Technically this can be done with “custom objects” but I could really streamline it, and make a good system that could be used to easily make combat stuff that’s either real time or turn based. But I don’t do combat in LEWD, so it’s not here now.
There’s nothing necessarily hard about adding these things, they just aren’t things needed for me right now, though they would be things others want/need to use the engine for their own games.