
When I knew I wanted to make a text adventure game; one that can handle ton of content; run in the browser; and be online so it can foster role playing, I knew I had to make a new engine for it(even if I can’t figure out what to call said engine).
I also knew I’d have to make development tools that make creating content easier.
I know a lot of text games out there require a programmer to manually add in content and program how it works. To really make LEWD as big as I want it, I need writers to be autonomous or else I’d just be hooking in programming for their content all day instead of actually making nice new programming for the game itself.
This means I needed to make something as simple as possible. Basically make adding new content as easy as it is to make a post on a forum or blog. Well, almost. It can never be that simple, since there is still some pseudo-programming involved.
I’ll start with the dev tools, before moving on to the “under the hood, how it works”.
When people say “game engine” they typically mean a combination of the code base, and the tools to create/author content.
These tools being easy to use for the future writing staff of LEWD also means that they, hypothetically, would also be easy for people to create entirely different games using the same tools.
It’s important to know that these tools are rough right now. I made them as just what I needed to write content with for the demo. There is going to be substantial changes and improvements to them when it comes time to have multiple writers using them. Since I’m pretty much the only person that would see this page, I didn’t put a ton of effort in making it too fancy or user friendly, but it will become much more user friendly. Still, I know they’re going in the right direction so I feel comfortable showing them
If the stretch goal is reached for player ships is reached, this is also essentially what players will get to use in order to add NPCs and other story content to their ship.
IE, at the helm of the ship someone could create an Event that pops up a description of that area. In some other area, they could write a complete NPC to interact with. Of course, there is far more that can be done, but that’s the most basic example.
Beyond that, I really want to make setting up and making a CYOA(Choose Your Own Adventure), VN(Visual Novel), and RPGs(Role Playing games, at least 2d ones) essentially as easy to setup and maintain as WordPress is.
Because the client is Javascript, it’s also very easy to add plugins to easily modify the client. But, more on that in Part2 coming later.
These are simply the tools that are used to create content. How that content is interpreted can be changed a lot by the client, but more on that will have to wait for Part2 where I detail the engine more.

First of all, it’s also a web page. There is no application to download to use.
I basically figured it should be where “if someone can play the game, they can make it”. It shares a lot of UI functionality with the game itself.
The map is more detailed. The map asset is actually an image that the server does interpreting on, and here you can see the 4 color channels that make it up (RGBA).
Clicking it instead of moving, pulls a squares property, highlights matching ones, and most importantly lists the Events(NPCs, scenes, so on) that are bound to it.
The Events that are bound to a square are the one that are iterated over each time a player enters that square.
Now, that’s how selecting the current content works.
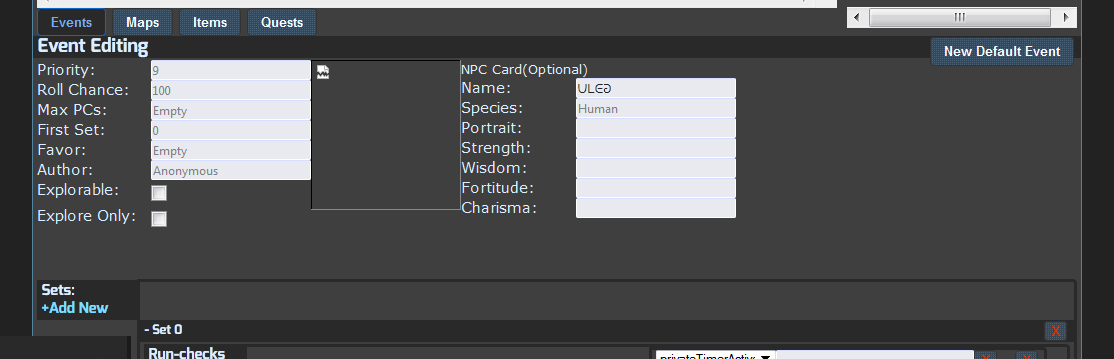
Below that, there’s the tab for the different sorts of content. Events, Items, Quests. I may make an API for skills/traits as well, and an API to change the structure of the solar system so it’s easier to adjust orbits and numbers of solar bodies. I’m just going to go over the scenes, Events, themselves as that’s enough to write on as it is.
So this part is really simple. A player enters an Area, one of those squares, and it triggers to iterate through the available Events to figure out which, if any, to show. There’s really basic variables to start with such as roll chance, priority(lower priority rolls first). They all have a default that doesn’t need changed in most circumstances. The roll chance and priority aren’t the only things that dictates if an Event pops up. You’ll see more on that next.
One other little note is how the “portrait” field simply takes a link. There is no compiling images into a package and pointing to them. This is an HTML5 game and all, so it’s easy to have things work like that.

Here is where all the writing goes.
There are “scenes”, which is one page. There is also “sets” which is basically a holder for sets. It’s for organizational purposes to make things easier for the writer to keep track of, which players are unaware of. It also helps with some of the trickier ways that content delivery can be modified. Pointers, the “gotos”, also show an excerpt of the that Scene they point to when hovered, to help keep track of an Event’s flow.
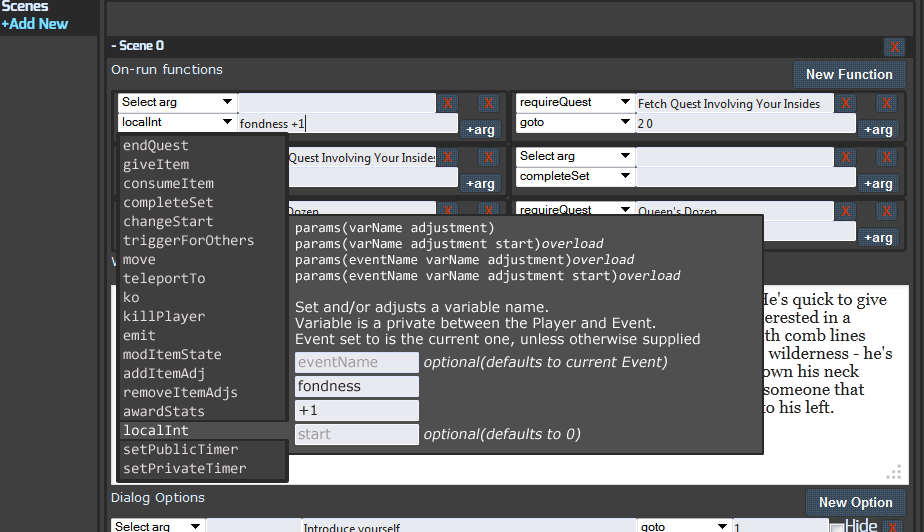
In addition to the writing, there are function that it runs. These are the key to ordering content. They can also be things that interact with the player.
In this example, when the Event starts it first runs those “Run-check” in the set. One of these checks that the set hasn’t been completed. If it has, it’ll just stop and never be sent to the Player. The next one sees is a privateTimer is set, which is a timer that is private between a Player and the Event(as opposed to a public one, which would be accessible to all players), and if it is it’ll also stop. That private timer is set at the start of a Scene being run, which in this case means that if the Event is rolled within 30 seconds of the last time it was rolled, it won’t continue. What it’s doing here is keeping it from popping up repeatedly when someone is just trying to move through, but then exiting out right as it comes up.
A similar system is used to change which options are available for the player to select, and whether or not it shows what requirement they don’t meet or not.This Event is a really simple example. It’s just 1750 words and a single set. In some older blog posts, you can see shots of some more complicated ones. Like this one (outdated).
It’s a simple system of arguments, then functions that run if they pass or fail. Multiple arguments can be listed, to have all need to pass for the argument to happen.
This part might seem daunting, since you can’t know what all those functions/args mean and what inputs they expect, but that’s because this is a part of the UI that really needs improvement. I want to make everything pretty much just clicking, dragging, dropping.
Like with a MOO and other engines, you can set variables for these Event objects.
You can set private variables between the Player and Event, like fondness as well as public ones accessible to other players like “how much the NPC hates the world” or “how many dicks she’s taken”.
There’s all that one would expect and more, but in a way that anyone can make use of it without programming experience.
Mockup:
One of the first things I’m going to do when the game is funded, is rework the drop down menus to work like this.
For me, the current drop down is fine since I wrote all those functions, and can look at the source, to see what exactly they do and what parameters they expect.
For others, to make it easier to use, I think something like this would be good.
With this, selecting the function(or argument for the other drop downs) would bring up information about what it does, what parameters it uses, and fields to input each parameter. For example, you click an “item id” field and it pops up a list of all the items in detail to select from, and selecting one inputs the id into the box.
In addition, I want to make it so instead of having to type things in like an Event name, Item id, Quest id, etc, you can just click the
Going further, if it comes to a point where people can make their own separate games on the engine, I also want to make it so custom functions can be written (in Javascript) in addition to the current ones.
This isn’t too difficult to add, but it’s just pointless at the moment when it’s just my game on it.
Basically, these functions are passed the current Event, Zone, Area, and the Player which a custom function can all reference. There are also functions for getting things. That’s a lot of extra documentation to write if it comes to that point.
I’ll also be adding a Wikipedia style revision history to the scenes on the tools, to keep track of past version of content and to undo mistakes.
I’ve been making these tools so many people can all be writing content at once for the same game, so there’ll be a lot to make sure that that work smoothly.
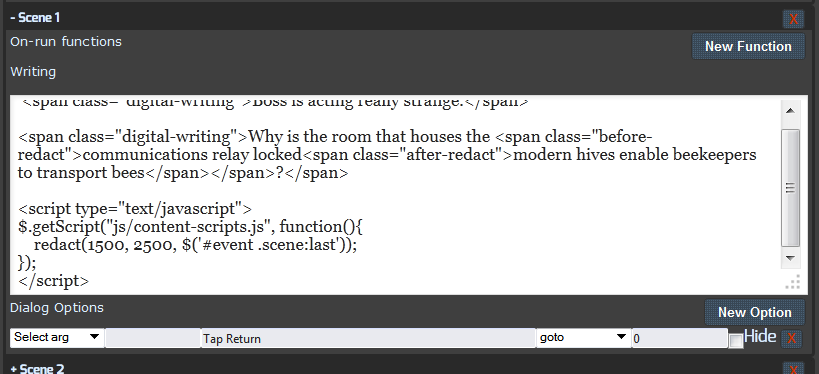
Now, this is an HTML5 game. That’s made it really easy to make it so html, and scripts, can be passed along with the writing. The writing parser knows to ignore these and not try to parse them.
Essentially, you can put a webpage inside a scene. That means things like a webcomic panel, a written note, and some javascript that does some fancy code of its own can all be there instead of simply text.
In this case, there are html tags to style the writing to look “digital”. Below that is a script tag containing some code that runs that redaction onto the writing. This is what makes that effect in Outpost 833 with the black bars and over writing to redact it.
What’s nice about this, is it doesn’t require a bunch of extra code cluttering up the client code. Special client code for a particular scene can be written write in the scene itself. It keeps it all nice and organized.
Technically, I could write a little game in there, with it also connecting all the other players that get that Event and connect to that game.
Another simple thing is that adding an image to the scene, if there was art for that, is as simple as <img src=”path://to/img.png” /> being put right in the scene. Just some basic web design knowledge goes along way, and allows anything to be done.
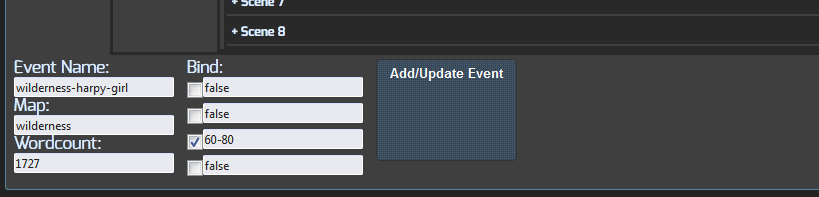
Lastly, there is how the Event gets saved.
A unique name is given, and “Bind” is what assigns it to areas of the map. In this case, it binds to all squares that have a blue channel between 60 and 80. This system allows to have Events bound to an array of areas with different degrees of overlap, or just to one single spot. But, that’s also not the only way that Events can be triggered to show up, but things are getting too in depth.
Another thing I want to add soon is to make it so one Event can have multiple bindings, instead of simply the one with a range. This’ll allow binding an Event to multiple Zones(maps), among other things. Really, there’s lots I want to add, of course, but I’m very happy with how it is so far.
Once that Add/Update button is clicked, it runs a check over what’s currently there to give a confirmation.
One of the other great things is that the Event(or Item, or Quest) is added to the game immediately. There is no compiling all the content and then having to push a patch to people. With LEWD, the client has a minimum that it needs given at runtime, and then content is passed as needed (and then cached).
This means that someone making content can see how it works in the game immediately, without having to restart the server or the client.
It also means that new content, like a large event, can be added to the game for players to enjoy also without needing any restarts.
Part 2 will continue later to detail how the engine actually works “under the hood”, and what it’s capable of
This part on just part of the tools was long enough, so I decided to split it up. Part 2 will come in a few days.